bistdunarrisch

joined 1 year ago
[–] [email protected] 1 points 1 week ago

Thank you for your nice comment!

[–] [email protected] 2 points 2 weeks ago (1 children)

The stripes are called walking noise/ pattern and often show up when not using a tracking mount and not using dithering.

Because not every pixel of your camera captures signal exactly equally bright you‘ll see this difference along the movement of the sky as it gets accumulated with every subframe. The only way to get rid of it is to vary the pixels for each part of the image after each exposure. This can be done by moving the camera slightly after each shot. This process is called dithering.

With good calibration frames the pattern can by minimized very slightly. Other than that the only real option for processing I can think of is to hide the pattern by not stretching the dark ares too much.

Other than that great image!

[–] [email protected] 3 points 1 month ago

I didn't check but would guess right about one hour. Plus ~30min registration. Normally I just start the process and leave my laptop and come back later, so I don't know for sure.


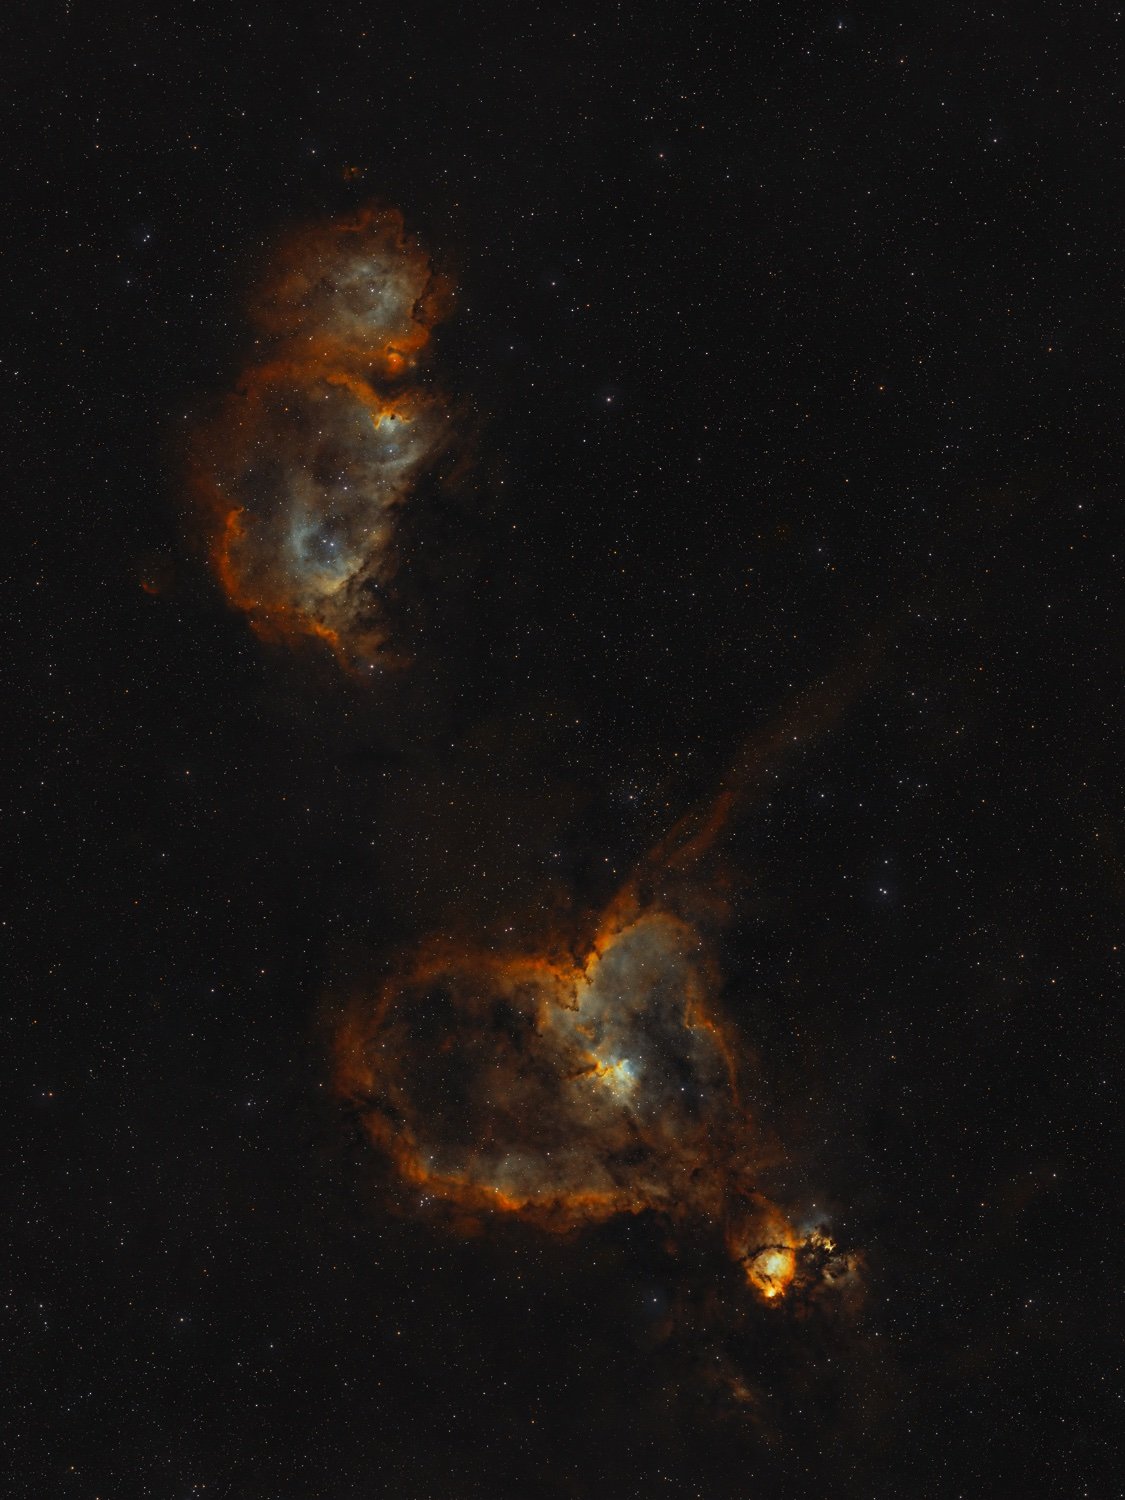
On our journey to shot the best images we can with our non ideal setup we collected more data on the heart nebula. Main problem with our setup is the distance of the sensor which is not perfect and results in bad star shapes in the corners. Stepping down to 2.8 and using BXT helps a lot. Combined with old data we gathered a total exposure time of 14 hours.

  • Samyang 135mm @f2.8 and f2.0
  • Fuji X-T5 (unmodified)
  • STC dual narrowband filter
  • Star Adventurer 2i
  • 856 x 60s
  • ISO 3200

Editing:

  • stacked, remove green noise, BGE in Siril
  • BXT, SXT in Pixinsight
  • streched with GHS in Siril
  • NXT, colouring, contrast, recombining stars in PS

Full resolution: https://telescopius.com/pictures/view/211833/deep_sky/ic-1824/heart-and-soul-nebula/by-maxi_franzi

[–] [email protected] 2 points 2 months ago

Absolutely stunning image! Thanks for sharing

124
submitted 3 months ago* (last edited 3 months ago) by [email protected] to c/[email protected]
 

Shoot with a Samyang 135mm lens and a Fuji X-T5.

[–] [email protected] 3 points 3 months ago

Also we were quite surprised how bright the nebula is. We didn't thought to get that much signal with 15min exposure time. Even more so as our camera is not infrared modified.


This is a first test to shoot NGC 7293 with a 135mm lens. Sadly we could only gather 15 min exposure time as the time frame for shooting this nebula is super short and we had a lot of clouds. Hopefully we have better conditions next year. But this test makes us hopeful to get a decent image with our equipment.

  • Samyang 135mm
  • Fuji X-T5
  • dual narrowband filter
  • Star Adventurer 2i
  • 29 * 30s
  • stacked in Siril
  • BXT, NXT, SXT
  • final editing in PS
 

Got another shot at C/2023 A3.

  • Samyang 135mm f2.0
  • Fuji X-T5
  • 603 x 5s
  • ISO 400
  • Stacked, streched in Siril
  • combined stars, comet and foreground in Photoshop
[–] [email protected] 1 points 3 months ago* (last edited 3 months ago) (1 children)

Ah ok, so I assumed you registered all your light frames onto your stars as your stars look very sharp. And that’s the normal way for every astro image you would normally do. A comet however moves so fast that its position changes even in the short time frame were you took the images.

So after registering all the images with the stars pattern you want to make a second registration were you mark the position of the comet on the first frame and on the last frame. With that now all images are aligned onto the comet and now the stars appear to move in the background. As your stars look so sharp I assumed you didn’t make the second registration. In DSS there is a comet mode for that but I haven’t worked with that so I can’t tell you about the workflow with that program.

Hope that helped in any way!

[–] [email protected] 1 points 4 months ago (3 children)

I do not have much experience with DSS, as far as I know the result should be very similar. „Lights“ is the term for a single exposure. The technique is basically the same no matter which software you use.

But if you have Siril specific questions feel free to drop any questions :)

[–] [email protected] 1 points 4 months ago (5 children)

It‘s hard to tell from your image, bit it appears you can even get a bit more details if you register your lights onto the comet itself and then stack all the images. I used Siril for the two step registration process.

But nice image nonetheless!

[–] [email protected] 1 points 4 months ago

Cool thank you!

[–] [email protected] 2 points 4 months ago

Lets see what the next days will bring. As the comet rises higher maybe it will be even more visible.

[–] [email protected] 2 points 4 months ago

Your image looks not to bad either. On my phone the comet looked the same like yours.

[–] [email protected] 1 points 4 months ago* (last edited 4 months ago)

Thanks for answering! Yes the comet moved quite a bit, but I stacked two images. One for the stars and one for the comet were I registered the images onto the comet itself. So the stream seems to be a real feature of the comet.

69
C/2023 A3 & M5 (lemmy.world)
submitted 4 months ago* (last edited 4 months ago) by [email protected] to c/[email protected]
 

We got extremely lucky and got a tiny window of cloudless sky in an never ending sequence of cloudy nights. Also the conditions were a nightmare with severe light pollution and lights shining directly at our equipment.

  • Samyang 135mm f2.0
  • Fuji X-T5
  • 158 x 5s
  • ISO 125
  • @f2.8

And maybe somebody here can explain to us what the ionized gas is that 'shoots out‘ in front of the comet?

Also do the colours seem to be correct? We tried our best at background extraction and maintaining the true colour, but the raw data was of poor quality. From images of other comets the dust tails normally seems to have a yellow/orange colour and only the plasma tail is blue.

Edit: found the answer to the Anti-tail. It shows the trail of dust were the comet has traveled, which appears to come out at the opposing side because of earths angle relative to the comet and sun.


Equipment:

  • Samyang 135mm f2.0 lens
  • Fuji X-T5 (unmodified)
  • Star Adventurer 2i

Images:

  • 220 x 60s
  • ISO 400

Processing:

  • stacked in Siril
  • remove green noise
  • background extraction
  • BlurXTerminator
  • NoiseXTerminator (0.5)
  • GHST
  • final editing and recomposition in Photoshop

More details: https://telescopius.com/pictures/view/202996/deep_sky/ngc-1456/pleiades/by-maxi_franzi


We really struggled to combine RGB with Ha. For our first try at continuum subtraction however we are very pleased.

Equipment:

  • Samyang 135mm f2.0 lens
  • Fuji X-T5 (unmodified)
  • Star Adventurer 2i
  • STC duo narrowband filter

Images:

  • 288x 60s RGB
  • 592x 60s narrowband

Processing:

  • stacked in Siril
  • remove green noise
  • background extraction
  • star removal on both rgb and Ha
  • continuum subtraction with Pixelmath in Siril
  • adding Ha to RGB with Pixelmath
  • BlurXTerminator
  • NoiseXTerminator (0.5)
  • GHST
  • final editing and recomposition in Photoshop

Full resolution and more details: https://telescopius.com/pictures/view/202859/deep_sky/ngc-206/m31-andromeda/by-maxi_franzi


M31 shot only in Ha and OIII.

Equipment:

  • Samyang 135mm f2.0
  • Fuji X-T5 unmodified
  • Star Adventurer 2i
  • STC dual narrowband filter

Images:

  • 650x 60s
  • ISO 3200

Processing:

  • remove green noise
  • background extraction
  • photometric colour calibration
  • BluXTerminator
  • NoiseXTerminator (0.4)
  • star removal
  • GHST
  • saturation, blending and final adjustments in Photoshop
 

We shoot this image over two nights to reveal the faint structures of the veil nebula complex.

Shot with a 135mm lens and a Fuji X-T5.

31
Veil nebula complex (lemmy.world)
submitted 5 months ago* (last edited 5 months ago) by [email protected] to c/[email protected]
 

We finally got two clear nights and although the moon was really bright, this target came out quite well due to the narrowband filter.

Equipment:

  • Samyang 135mm f2.0
  • Fuji X-T5
  • Star Adventurer 2i
  • Duo narrowband filter

Images:

  • 466 x 60s lights
  • ISO 3200
  • @f2.8

Editing:

  • Stacking with drizzle in Siril
  • Background removal in GraXpert
  • photometric color calibration in Siril
  • BlurXTerminator
  • 0.3 denoising with BlurXTerminator
  • Star removal
  • Stretching in Siril with GHST
  • final composing in Photoshop (saturation, contrast, blending with stars)

Full resolution and more details: https://telescopius.com/pictures/view/198606/deep_sky/ngc-6974/veil-nebula-complex/by-maxi_franzi

2
M31 (lemmy.world)
submitted 6 months ago* (last edited 6 months ago) by [email protected] to c/[email protected]
 

~~We got a lucky shot of Andromeda with a meteor crossing our view.~~ Apparently we shot a satellite flare next to Andromeda.

Images:

  • Samyang 135mm @2.8
  • Fuji X-T5
  • Star Adventurer 2i
  • 465 x 30s
  • ISO 200

Processing:

  • stacking, stretching, background extraction and star separation in Siril
  • final composition in Photoshop
view more: next ›